

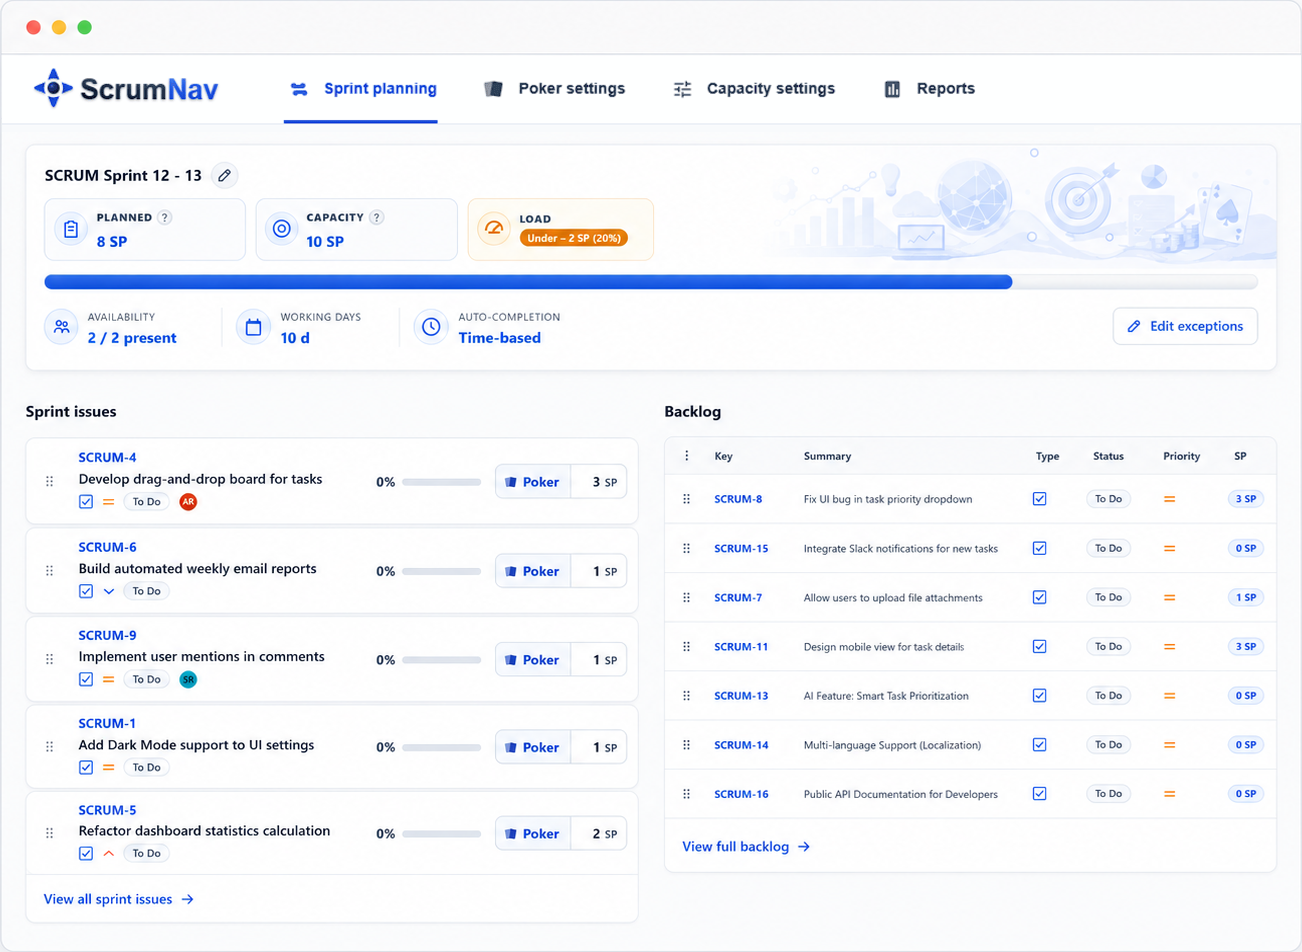
Short answer: Open ScrumNav sprint planning, pick your board and sprint, then scope work while watching the live capacity bar (OK, over, under). Edit story points inline or open Scrum Poker; adjust completion % on carry-over items. Changes save to Jira. For the full Jira sprint planning workflow (backlog, Sprint Goal, Start sprint), see how to run sprint planning in Jira and how to create a sprint in Jira.
What is ScrumNav sprint planning?
ScrumNav sprint planning is a single Jira Cloud view for scoping the next sprint. You see sprint issues and board backlog together, edit story points, adjust completion % on in-progress work, and watch planned load against your configured capacity, without switching between backlog, issue detail, spreadsheets, and a separate estimation tool.
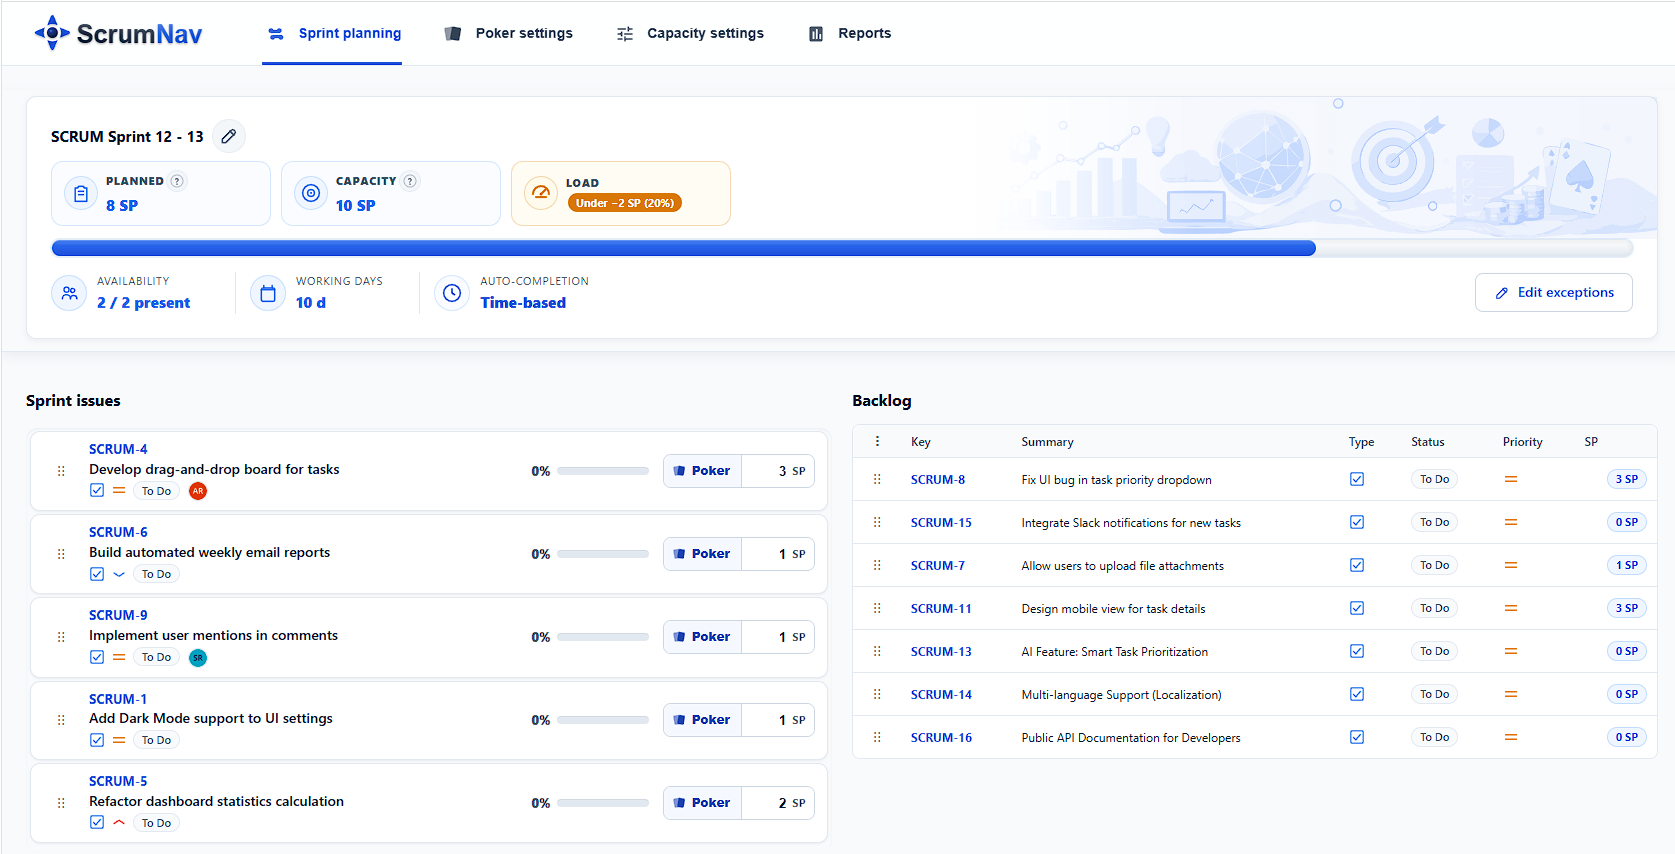
ScrumNav does not replace Jira sprint mechanics. You still create and start sprints in Jira. ScrumNav helps you decide what fits before you click Start sprint. Set up capacity first in the capacity guide.
Capacity bar and OK / over / under
The capacity bar at the top compares planned sprint load to your configured capacity model: team days, efficiency, holidays, and optional recommended capacity from recent closed sprints.
- OK (Balanced). Planned load is close to capacity (within about 10%).
- Over. You have planned more story points than the model allows.
- Under. Spare capacity remains; you can add scope or keep a buffer.
The badge updates live as you move issues, edit story points, or change completion %. Use it during planning to stop before over-committing. For capacity vs velocity concepts, see velocity vs capacity in Jira sprints.
Sprint and backlog side by side
Sprint issues (excluding Done) and the board backlog appear in one layout. Drag and drop between sprint and backlog to trim scope or add ready work. Reorder within each list to reflect delivery priority. Rank changes sync to Jira.
Most teams scope a draft sprint during refinement, then confirm in the planning meeting. ScrumNav supports both: review what is already in an unstarted sprint, or drag items in live. For the meeting workflow, see the sprint planning agenda.
Story points and Scrum Poker
Edit story points inline on any issue in the planning list. ScrumNav saves values to your configured Jira story point field. For consensus estimates, open Scrum Poker from an issue without leaving sprint planning.
Estimate unpointed work before you add more scope. The capacity bar only reflects realistic load when issues have points. For estimation tips during planning, see how to run sprint planning in Jira.
Completion % for carry-over
For in-progress or carry-over items, adjust completion % with a slider or manual override. A nearly done ticket should not consume full story points in the remaining load bar. This helps plan realistic scope when unfinished work rolls into the next sprint.
After the sprint, use Jira sprint reports in ScrumNav to review planned vs delivered. For rollover trends across closed sprints, see the Jira carry over stories report.
Step-by-step in ScrumNav
- Open ScrumNav from Jira apps and go to the sprint planning view.
- Select your board and the sprint you are planning (active, future, or automatic selection).
- Review capacity at the top. Confirm team days and shared time off if needed. See the capacity guide for setup.
- Scope the sprint: review issues in an unstarted sprint or drag from the backlog. Watch planned load vs capacity (and your planning target, e.g. 85–95%) as issues move.
- Estimate unpointed work: edit story points inline or open Scrum Poker.
- Adjust completion % on carry-over or in-progress items.
- Watch the capacity indicator: stop adding scope when status moves from under to OK, or discuss trade-offs if it shows over.
- Start sprint in Jira when the team commits. ScrumNav does not start sprints; use the Jira backlog for Start sprint.
Jira sprint planning basics
ScrumNav sits on top of Jira Software Cloud. These articles cover native Jira workflow, not ScrumNav product steps:
- How to run sprint planning in Jira — backlog prep, Sprint Goal, capacity, estimates, scope, Start sprint
- How to create a sprint in Jira — Create sprint, add issues, dates, sprint goal, Start sprint
- How to plan a realistic sprint in Jira — buffer, carry-over, forecast error
- Sprint planning agenda — meeting blocks and draft-sprint workflow
Frequently asked questions
- How do you run sprint planning in Jira?
- Sprint planning in Jira happens on the Scrum backlog: prepare a draft sprint, agree a Sprint Goal, confirm capacity and carry-over, review ready issues, estimate, trim scope, then Start sprint. See how to run sprint planning in Jira for the full workflow.
- How do you create a sprint in Jira?
- On the Scrum backlog, select Create sprint, add issues, estimate, and Start sprint when the team commits. See how to create a sprint in Jira for step-by-step Jira mechanics.
- How do you avoid over-committing during sprint planning?
- Compare planned story points to this sprint's capacity, not a wish list. In ScrumNav, watch the capacity bar (OK, over, under) as you scope the sprint. See how to plan a realistic sprint in Jira for buffer and carry-over.
- Can I move issues between sprint and backlog in ScrumNav?
- Yes. Sprint planning supports drag and drop between the sprint list and board backlog, including rank changes within each list. Most teams use this to trim scope or move not-ready items out; dragging new work in during the meeting is supported but slower than scoping a draft sprint in refinement.
- Do story point edits save to Jira?
- Yes. When you edit story points in the planning list, ScrumNav saves the value to the configured Jira story point field.
- Which boards and sprints does ScrumNav support?
- ScrumNav works with Jira Software boards you have access to. You can pick active or future sprints, or use automatic sprint selection depending on your workflow.
- Can I estimate issues without leaving sprint planning?
- Yes. Open Scrum Poker from an issue in the planning view, run a round, and apply the agreed story points back to Jira without switching tools.
- What does the OK / over / under status mean?
- The badge at the top of sprint planning compares planned sprint load to your configured capacity. OK (Balanced) means load and capacity are close (within about 10%). Over means you have planned more story points than the model allows. Under means spare capacity remains. It updates live as you move issues and edit points. Set up the capacity model in the capacity guide.
Try sprint planning with capacity, estimates, and history in the interactive demo.